
Are you ready to transform your backyard into the ultimate gathering spot? Installing an outdoor kitchen island can turn your outdoor space into a stylish and functional area for cooking, dining, and entertaining.
But where do you start? This guide will walk you through every step, making the process simple and stress-free. By the end, you’ll have the confidence to create an outdoor kitchen island that fits your space and lifestyle perfectly. Let’s dive in and bring your dream outdoor kitchen to life!
Credit: www.eztube.com
Planning Your Outdoor Kitchen Island
Planning your outdoor kitchen island is the foundation for a successful installation. This phase helps you avoid costly mistakes and ensures your space matches your lifestyle and cooking habits. Careful thought about location, materials, and design will make your kitchen both practical and inviting.
Choosing The Right Location
Pick a spot that balances convenience and comfort. Place your island near your indoor kitchen or dining area to make food transfer easy. Avoid locations exposed to strong winds or direct sunlight for long periods to keep your cooking experience pleasant.
Think about utility access too. Does the location have easy access to water, gas, or electricity? If not, factor in the cost and feasibility of adding these connections.
Selecting Materials And Appliances
Materials should withstand weather and heavy use. Stainless steel is a popular choice for durability and easy cleaning. Concrete countertops offer heat resistance, while natural stone adds a stylish touch but requires more maintenance.
Choose appliances that fit your cooking style. A built-in grill is essential, but consider adding a side burner, refrigerator, or even a pizza oven based on your needs. Quality matters here—better appliances last longer and perform reliably.
Designing For Function And Style
Your kitchen island should be more than just a cooking station. Think about seating options—would a bar area encourage guests to hang out while you cook? Include storage solutions to keep utensils and spices handy.
Colors and finishes set the mood. Match your island with the overall outdoor décor or let it stand out as a centerpiece. What vibe do you want your outdoor space to have? Practicality and style can work together when you plan carefully.
Preparing The Installation Site
Preparing the installation site is the foundation of a successful outdoor kitchen island project. This stage sets the tone for stability, durability, and safety of your cooking space. Taking time here will save you headaches and extra costs later on.
Clearing And Leveling The Area
Start by removing grass, rocks, and debris from the spot where your island will go. You want a clear, open space that’s easy to work with.
Use a shovel and rake to level the ground. Uneven surfaces can cause structural problems and make your island unstable.
Have you checked if the area gets enough sunlight or shade? This can affect your cooking comfort and material choice.
Ensuring Proper Drainage
Water pooling around your kitchen island can lead to damage and mold. Make sure the site allows water to flow away naturally.
If needed, create a slight slope away from the island, about 1 inch per 8 feet. This prevents standing water after rain.
Consider installing drainage pipes or gravel beds if your soil retains too much moisture. This extra step is worth it to protect your investment.
Laying A Solid Foundation
Your outdoor kitchen island needs a strong base to support heavy appliances and countertops. Concrete slabs are a popular choice for stability.
Pour the concrete evenly, making sure it’s thick enough—usually 4 to 6 inches—to handle the weight. Reinforce it with rebar or wire mesh if possible.
Let the foundation cure completely before starting construction. Rushing this step can cause cracks and weaken your island’s structure.
Building The Base Structure
Building a strong base structure is the backbone of a durable outdoor kitchen island. This foundation supports all the components and ensures your island stays sturdy through different weather conditions. Focusing on the base early in the process will save you time and headaches later.
Framing The Island
Start by framing the island using pressure-treated lumber or metal studs designed for outdoor use. These materials resist moisture and prevent rot, which is crucial for an outdoor setup. Make sure the frame is level and square—it’s the key to a smooth installation of cabinets and countertops later.
Think about how you want to arrange your appliances and storage before framing. This helps you build a frame that fits your layout perfectly. Don’t forget to leave space for plumbing or electrical work if you plan to include a sink or lighting.
Installing Cabinets And Storage
Choose weatherproof cabinets built specifically for outdoor kitchens to avoid damage from rain and sun. Secure them firmly to the frame with stainless steel screws to prevent rust and ensure longevity. Adding adjustable shelves inside helps you customize storage for utensils, grill tools, or even a mini fridge.
Consider the flow of your cooking space—where will you need quick access to spices or plates? Installing storage in logical spots makes cooking outside more enjoyable and efficient.
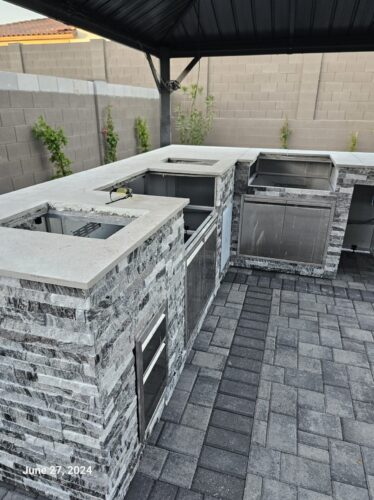
Adding Countertops
Select countertop materials that withstand heat and outdoor elements, like granite, concrete, or stainless steel. These options are not only durable but also easy to clean after cooking sessions. Attach the countertops securely to the frame and cabinets, ensuring no gaps where water can collect.
Have you thought about adding an overhang for bar seating? It’s a simple addition that can turn your island into a social hub. A well-chosen countertop can really elevate the look and function of your outdoor kitchen island.

Credit: pbphomerepair.com
Setting Up Utilities
Setting up utilities is a crucial part of installing an outdoor kitchen island. Proper planning ensures your kitchen works safely and efficiently. Focus on electrical, plumbing, and gas lines. Each utility needs careful attention to meet safety standards and local codes.
Running Electrical Connections
Electrical connections power your appliances and lighting. Use outdoor-rated wiring and weatherproof outlets. Place GFCI outlets to prevent shocks. Hide cables inside conduit pipes for protection. Connect to a dedicated circuit in your main panel. Label the circuit clearly for easy maintenance.
Installing Plumbing Fixtures
Plumbing provides water supply and drainage. Use durable pipes made for outdoor use. Install a shut-off valve for quick water control. Connect the sink to both hot and cold water lines. Include a drainage system that leads away from your kitchen. Test all connections to avoid leaks.
Ensuring Gas Line Safety
Gas lines power grills and burners. Use flexible gas piping approved for outdoor use. Check local codes for proper installation rules. Install a shut-off valve near the gas source. Use a gas leak detector during and after installation. Never skip professional inspection to ensure safety.
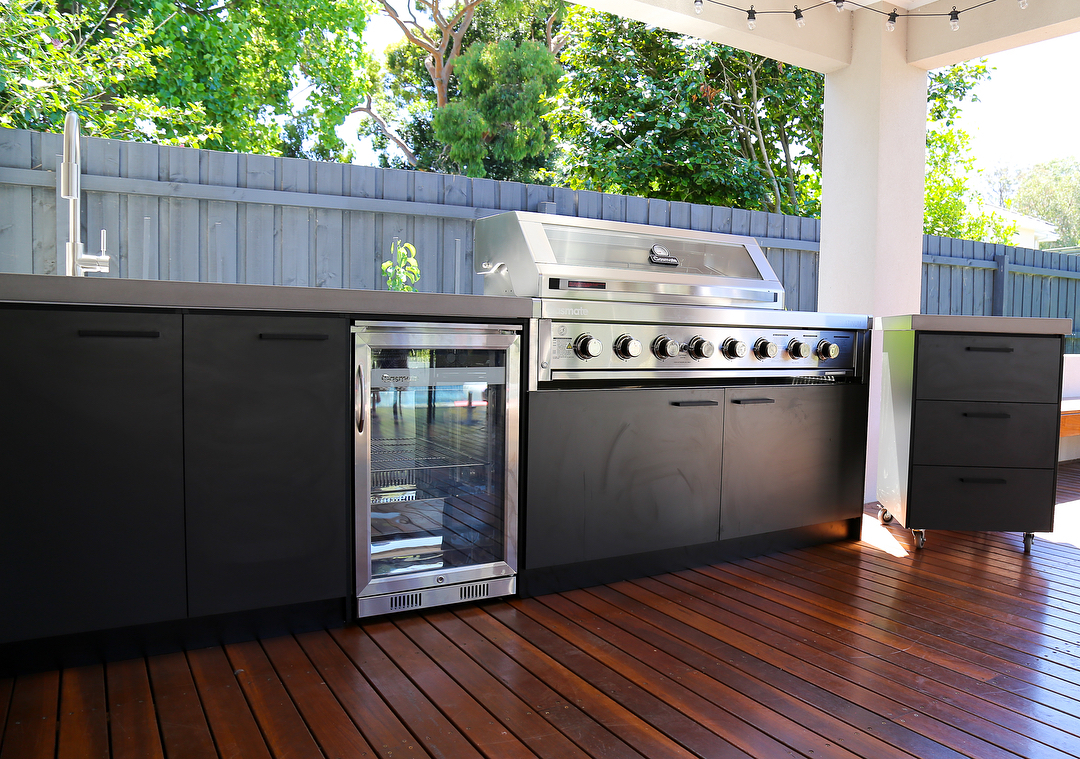
Installing Appliances And Fixtures
Installing appliances and fixtures is key to creating a functional outdoor kitchen island. Each appliance must fit well and work safely. Proper placement improves cooking flow and convenience. Wiring and plumbing require careful planning for smooth operation. The right accessories add style and comfort. This section helps you add grills, refrigerators, sinks, lighting, and more.
Placing Grills And Cooktops
Choose a sturdy, level surface for grills and cooktops. Position them away from walls and flammable materials. Leave enough space around for safety and ease of use. Ensure proper ventilation to avoid smoke buildup. Connect gas lines or electricity according to manufacturer instructions. Check for leaks or faults before first use. Consider a cover to protect from weather.
Adding Refrigerators And Sinks
Select outdoor-rated refrigerators and sinks for durability. Place refrigerators near prep areas for quick access. Connect them to a dedicated power source with a weatherproof outlet. Install sinks close to water lines with proper drainage. Use stainless steel or weather-resistant materials to prevent rust. Seal all connections tightly to avoid leaks. Test water flow and drainage before use.
Incorporating Lighting And Accessories
Install bright, energy-efficient lighting to enhance visibility. Use waterproof fixtures designed for outdoor spaces. Position lights over cooking and prep areas. Add task lighting under counters or inside cabinets. Include electrical outlets for small appliances and gadgets. Add hooks or shelves for utensils and storage. Choose styles that match your outdoor kitchen design.
Finishing Touches
Finishing touches are what transform your outdoor kitchen island from a simple setup into a welcoming, functional space. These details not only enhance the look but also protect your investment and improve your cooking experience. Let’s look at how to properly seal surfaces, add comfortable seating and decor, and keep your outdoor kitchen in top shape.
Sealing Surfaces
Sealing your countertops and other surfaces is essential to protect them from weather and spills. Use a high-quality sealant designed for outdoor use, especially if your surfaces are natural stone or concrete. Apply the sealant evenly and allow it to cure fully before using the kitchen to prevent stains and cracks.
Think about how much time you want to spend on maintenance later. A well-sealed surface can save you hours of scrubbing and repairs. Have you checked whether your sealant is UV-resistant? This can prevent fading and damage from sun exposure.
Adding Seating And Decor
Comfortable seating invites friends and family to stay longer, turning your kitchen island into a social hub. Choose weather-resistant chairs or stools that complement your kitchen’s style. Adding cushions with removable covers makes cleaning easier and adds a pop of color.
Decor isn’t just about looks—it sets the mood. Consider string lights for evening gatherings or potted herbs for fresh garnishes. Small touches like a stylish utensil holder or a weatherproof clock can make a surprising difference in usability and charm.
Maintaining Your Outdoor Kitchen
Regular maintenance keeps your outdoor kitchen looking great and functioning well year-round. Wipe down surfaces after each use to prevent buildup of grease and dirt. Check appliances periodically for any signs of rust or wear and address issues promptly.
Have you set a maintenance schedule? A simple checklist can help you stay on track without feeling overwhelmed. Remember, cleaning your grill after every cookout can extend its life by years, saving you money and frustration.
Credit: www.extraspace.com
Frequently Asked Questions
What Materials Are Best For Outdoor Kitchen Islands?
Durable materials like stainless steel, stone, and concrete are ideal. They resist weather, heat, and moisture. Choose materials that match your outdoor style and require low maintenance for long-lasting beauty and function.
How Do I Prepare The Site For Installation?
Clear and level the area where the island will sit. Ensure proper drainage and a stable foundation. Mark utility lines for gas, water, and electricity to avoid damage during installation.
What Utilities Are Needed For An Outdoor Kitchen Island?
You typically need gas for the grill, water for a sink, and electricity for lighting or appliances. Plan connections carefully to ensure safety and compliance with local codes.
Can I Install An Outdoor Kitchen Island Myself?
Yes, if you have basic DIY skills and tools. Follow manufacturer instructions closely. For complex plumbing or electrical work, hire professionals to ensure safety and code compliance.
Conclusion
Creating an outdoor kitchen island enhances your backyard space. It offers a new area for cooking and gathering. Follow the steps carefully to ensure a smooth installation. Choose quality materials for durability. Plan the layout before starting to avoid mistakes.
Keep tools handy and follow safety measures. Invite family and friends over once it’s complete. Enjoy cooking outside and make lasting memories. This project not only adds value but also brings joy. Ready to savor outdoor meals? Start building your kitchen island today!